Unit 6 Projects
Whimsical House
For this project I had a few hiccups. Once it was assigned I immediately got to work and got an insporation picture. My original thought was to make it which was a triangle sort of house. I had made it and then once I. went outside the class after I made it, the project was still there but one of the walls fell down. I decided I wouldn't love this project and had an idea to make a mug. Throughout the year of ceramics I found my love for making mugs and there has been many ups and downs but I really wanted this project to workout as it would be my bestfriend's birthday present, so I planned out my project. I started by making the mug itself and then I went on Pinterest to look for inspiration. I started by making the mug so I could find a inspiration photo that would fit on the mug size.
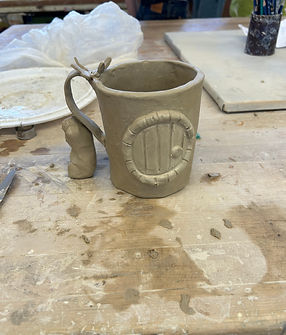


I started by getting the actual mug done and then score and slipped on a circle. I then added the details to the door and put on a handle, and so the handle wouldn't break I molded a ball to hold it up.
I then started to add details such as flowers and vines. For the flowers I used my resources that are given to us such as cookie cutters. I scored and slipped all of them on.
Here is another angle of the details. All of the details were scored and slipped onto the mug.


Once my piece was complete and bone-dry I decided to under-glaze it all white since I prefer over-glazing other than under-glazing.
Over-glazed most of the mug, my goal was for it to look like a tree.
For the handle I decided to make it look sort of like a vine and I love it! I used different shades of green to make it more realistic.

Finished Glazing
Here is the final result. Later on the handle broke off but I am planning on gluing it back on.
Advanced Large Sculpture/Organic
This Project was definitely out of my comfort zone. Everytime I looked for a inspiration photo I was unable to find one, until I looked on instagram. I was lucky enough to find the funkiest and coolest pot ever! I genuinely loved it and immediately wanted to do it, so I did.
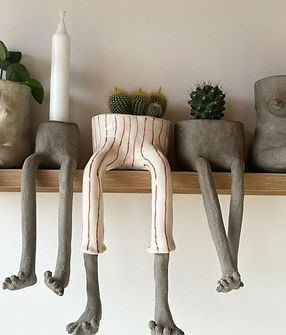


My Inspiration Photo, specifically the one in the middle with pajama pants.
I started by making a pinch pot.
For the legs I molded clay into this shape and slipped and scored them onto the mug.


The legs on the mug. I then scored and slipped a second part of leg into the thigh and then scored and slipped on feet. I then cut out toes that ended up looking funky.
Unfortunately, one of the legs fell off while I was sanding it because it bumped on the table.
I then under-glazed the whole mug white.

I then glazed the mug and did the same pajama stripes but the stripes are blue.
Here is the final result. Later on the handle broke off but I am planning on gluing it back on.
Vessel with Interesting Foot
For the Interesting Foot Project I decided that I wanted to do something simple. I didn't need to find inspiration. I wanted to make it simple because I wanted it to be a mothers day gift to my mom who loves to plant.


Started by making a pinch pot
I then slipped and scored on the legs.
I then underglazed the pot.


Another angle of the pot. I put holes in the bottom of the pot for the water to exit.
Then once it came out of the kiln I over-glazed it a pink color.
I then under-glazed the whole mug white.
Tea Pot
For the Tea Pot Project I was unfortunately never able to make. I would've loved to make it but I didn't have time and wanted to focus on my final. I chose a couple inspirations I would've used if I ended up making the Tea Pot.


I really love the colors on this Tea Pot. I would've easily taken inspiration
This Tea Pot is adorableee and I love how the mug matches. I would've made this aswell I literally wouldn't have been able to decide!
There's no way that I would've ever been able to make this, however I love the creativity the artist put into it.
Final
IFor my final I didn't have much of a plan, to be honest no plan at all. I thought to just make it like tropical theme/ocean themed so thats what I did.


I started by making a slab and then I cut out the shape of a surfboard and smoothed out the edges.
The next class I then under-glazed the board with a light blue color, I then found a photo of a surf board and got the inspiration to slightly draw a line down the middle so it dips down a bit in the middle. I then under-glazed the line white which took a long time to make it perfect.
As soon as it came out of the kiln I over-glazed it with a blue and painted the line down the middle white once again. The line took very long to do since I wanted it to be literally perfect, I even had my friend Brooke help me because my hand was shaking.


For my placemat I wanted it to be very simple. All I did was find different photos of drawings of hibiscus flowers and drew them as well as cute little ocean doodles.
Here is the completed placemat that I actually love how much color and detail I put into it, as well as the platter. I love how the middle line is very vibrant and easily to see, and it's actually straight!
Here is my Final Platter along with the snack I added. I originally wanted to make Tonghulu which is a Japanese snack with fruit covered in melted sugar and it hardens and turns crunchy. I then figured it would've fit better if my platter was inspired by the Japanese culture, but it isn't. So I decided to get gummies from Trader Joes and use those as the course.